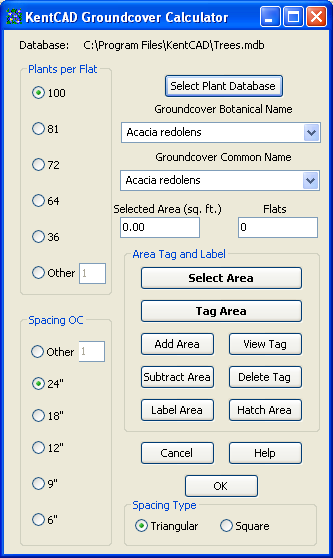
KentCAD Groundcover Calculator
Operating Instructions
The KentCAD Groundcover Calculator enables you to place groundcover planting information into your AutoCAD drawing. You can retrieve this information and include it later in a complete Plant List for the drawing.
Before you can begin assigning plant information, you must create areas that you intend to fill with groundcover. Draw the areas to be planted with standard AutoCAD drawing commands. Note that all area boundaries must be closed as if you were going to hatch them or measure their areas with the AutoCAD AREA command. The areas must be closed polylines, splines, ellipses or circles.
After you have activated the Groundcover Calculator, you need to choose what planting parameters (the kind of plant and how you want it to be planted) to apply to the area.
You can either choose a plant from the KentCAD Plant Database or from your own plant database. By default, the Groundcover Calculator initially chooses the KentCAD database, but you can create your own database using the tools in the KentCAD Software Suite.
To select a different database for choosing your plants, click the Select Plant Database button, locate your database, and click the Open button. The groundcover plants from the database you chose will appear in the Groundcover Calculator.
Select a plant by either its botanical name or its common name. Note that when you choose a plant from one of these lists, the other list automatically scrolls to display the name that corresponds to the name you chose.
Select the number of Plants per Flat according to the way the plant is provided by your nursery. Select the Plant Spacing Type (triangular or square) and the Spacing OC (on center) distance to be used when planting. If you want to use a different spacing or a different number of plants per flat, choose the Other option and fill in the value you want to use.
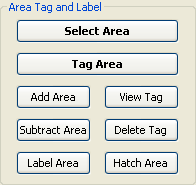
Use the Select Area button to choose the area where you want to place your chosen groundcover plant. You can use this button to select multiple areas, if desired, or use the Add Area and Subtract Area buttons so that all the areas you want to use for this plant are highlighted.
Note that the Selected Area and Flat Count values will change as more (or less) area is selected, or as you change the plant spacing.
The Tag Area button applies the plant information from Step 2 to the areas you selected in Step 3. If this step is not done, the plant information will not be saved. This information tag will not be visible in the drawing.
Step 5. View and Edit the Tag
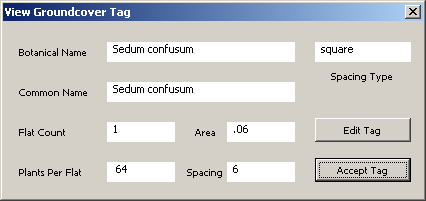
The View Tag button displays the plant information that you applied in Step 4 in the View Groundcover Tag dialog box. This gives you a method of checking your progress toward tagging all the areas to be planted, and allows you to change any of the planting parameters you set in step 2. Once the tag you view displays the information you want, click Accept Tag to return to the main Groundcover Calculator dialog box.
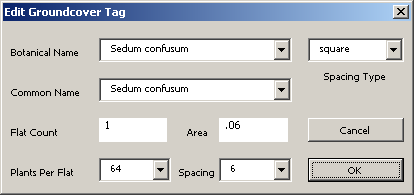
If you want to change the tag shown in the View Groundcover Tag dialog box, click the Edit Tag button. The Edit Groundcover Tag dialog box permits you to change any or all of the settings you chose in Step 2. Clicking OK applies your new settings to the area(s) selected in Step 3.
If you want to remove all the information that you applied in Steps 4 and 5, click the Delete Tag button.
The Label Area button puts the tag information into text form, which gives you a convenient and editable way of adding plant information to the drawing.
The Hatch Area button gives you a quick way of applying a hatch pattern to the areas you selected in Step 3. You can change the pattern as desired with the AutoCAD HATCHEDIT command.
The OK button stores the tag information that you have created in a form that you can later retrieve and place into an Excel spreadsheet and/or a Plant List that you can add to your drawing. You can then select different plants and different areas, starting again at Step 2, or you can overwrite your previous choices. Remember to use View Tag to check on the current information applied to each area before clicking OK.
The Cancel button lets you automatically remove the tags that you applied to the areas last selected (they are highlighted to show you what will be removed if you say Yes to the "Clear tags from selected areas?" dialog box. If you want to quit without removing anything, choose No.